How to Create Dark Tunnel Files in 2026 (SSH + SNI Tutorial)
Happy New Year 🎉 Welcome to 2026!
In this complete guide, you’ll learn how to create Dark Tunnel files in 2026 using SSH and SNI. This step-by-step Dark Tunnel tutorial is beginner‑friendly and explains everything from generating SSH accounts to exporting your final Dark Tunnel configuration file.
This method is simple, fast, and currently working when configured correctly.
Disclaimer:
This tutorial is for educational purposes only. We do not encourage or support any misuse of the information shared. Use this guide responsibly.
What You Need Before You Start
Make sure you have the following:
- A working internet connection
- Dark Tunnel app installed
- SSH WebSocket account access
- A valid SNI Host
We'll be using these two websites:
Create an SSH WebSocket Account
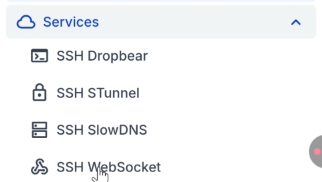
SSHOcean homepage showing Services → SSH WebSocket
- Open your browser and go to sshocean.com.
- From the menu bar, click on Services.
- Select SSH WebSocket.
- Scroll down and choose one of the available servers (e.g., Singapore or USA).
- Click Get Started on your chosen server.
- Enter a unique username and password.
- Click Create Account.
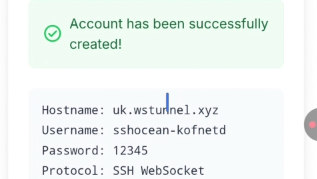
Successful SSH account details display
Copy the Required Details
From your SSH account details, copy the following:
Generate an SNI Host
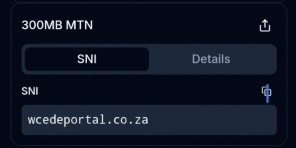
SNI Generator section on snihost.com
- Visit snihost.com.
- Scroll down to the SNI Host Generator section.
- Click on Open SNI Generator.
- Type your country name and select it from the dropdown list.
- Copy one of the generated SNI hosts that correspond to your network provider.
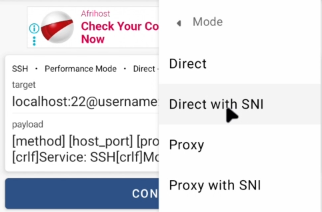
Configure Dark Tunnel
Dark Tunnel app initial interface
- 1Open the Dark Tunnel app.
- 2Tap the three-dot menu in the top right corner.
- 3Select Inject Config.
- 4Tap on Mode and choose Direct with SNI.
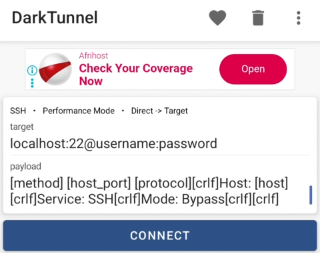
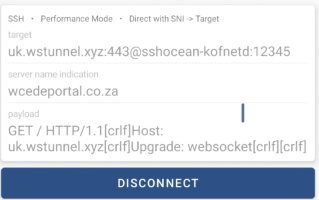
Edit the Configuration Details
Direct with SNI configuration screen
Now replace the default values with the details you collected from SSHOcean and SNIHost:
Server / Host Name
Replace localhost with the Host Name from SSHOcean.
Port
Set the port to 443 (recommended) or 80.
Username & Password
Enter your generated SSH credentials carefully.
SNI (Server Name Indication)
Paste the SNI Host you generated from snihost.com.
Payload
Delete everything in the payload box and paste the SSL/TLS Payload from SSHOcean.
Connect to Dark Tunnel
With all details entered, you're ready to launch:
Wait a few seconds for the connection 🎉
Export and Save Your Dark Tunnel File
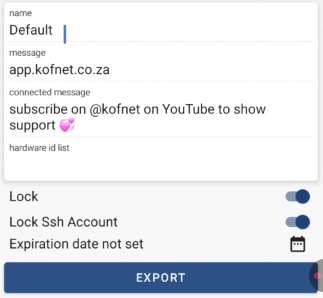
- Disconnect from Dark Tunnel.
- Open the menu (three dots) → Config → Export.
- Choose **File** (recommended).
- Enter a descriptive file name.
- Click Export to save to your local storage.
Frequently Asked Questions
Is Dark Tunnel still working in 2026?
Which port is best for Dark Tunnel?
Can I share my Dark Tunnel file?
Is this method free?
🎯 Final Words
That’s it! You’ve successfully created your Dark Tunnel file in 2026 using SSH and SNI. This method works well when all details are entered correctly.
Join our community for more updates! ✌️